Open your Steam library and choose to display Games and Software.
Right-click Soundpad and select Install.
Click through the upcoming installation dialog of Steam.
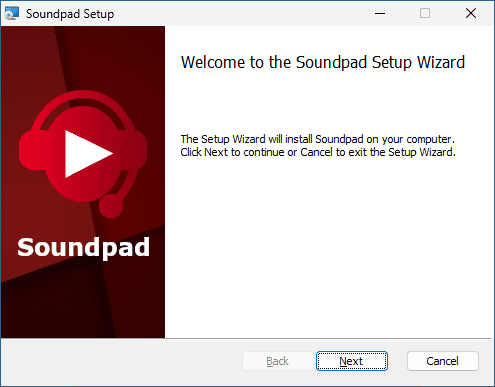
1.2 Standalone version
Run the installer. It is an msi file with a name like Soundpad_x64-1.1.0.msi.
Then follow the installation wizard.
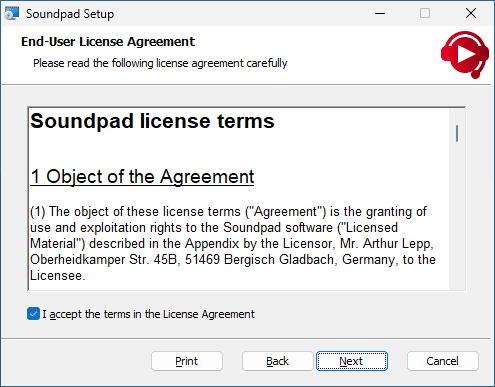
You have to accept the license terms in order to continue.
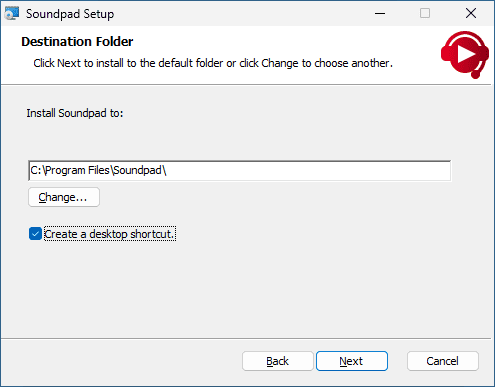
Select an installation directory or keep the default.
You may choose to let the installer create a desktop shortcut to Soundpad.
A start menu shortcut will be created automatically.
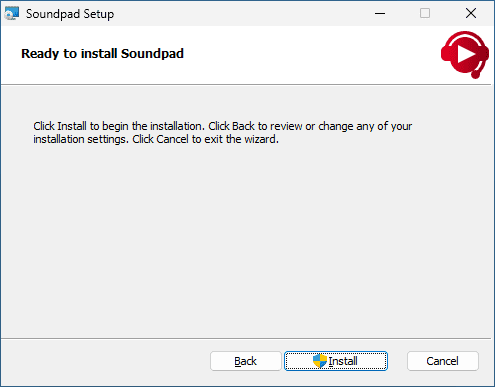
Administrator privileges are required to install Soundpad.
By clicking on install you will see a prompt to allow the installation.
Soundpad has been installed successfully.
2 Configuration
2.1 Setup and device configuration
This chapter explains how Windows, Soundpad and voice applications must be configured,
in order for Soundpad to work correctly.
By default, Soundpad gets installed on the default recording device, and it also configures all of its
requirements automatically.
Windows
1. Press Win+R and type mmsys.cpl
2. This window pops up.
It shows your recording devices and marks the default one with a green check icon.
Most voice applications are preconfigured to use the default recording device.
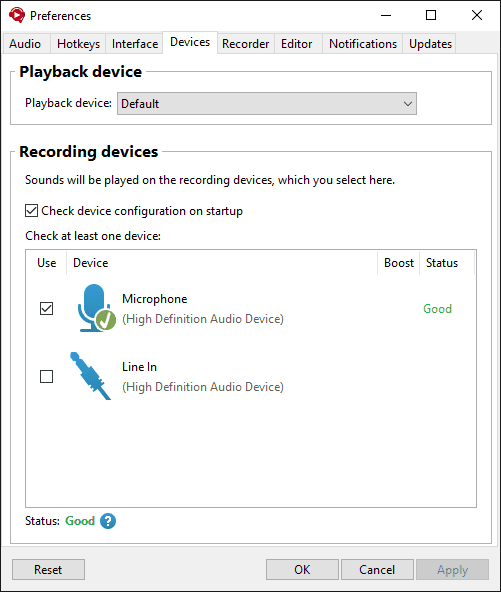
Soundpad
This is the device control panel in Soundpad. You can access it by going
to File ▶ Preferences and switching to the Devices tab.
The default recording device is marked with a green check icon, just like in Windows.
Soundpad is only activated for devices, whose Use-Checkbox is checked.
On Win7, 8 and 8.1 only: The checkbox Disable Windows Audio DRM Validation must
be checked, too.
If everything is okay, the status will be a green Good, otherwise it is
red and will show you further information about the reason.
Voice applications
In your voice application you need to select the same recording device,
which you configured Soundpad for.
If you didn't change the voice application's configuration, then
it usually uses your default recording device.
Some voice applications filter sounds fiercly.
Played sounds might sound strange, get cut off or filtered out entirely.
You need to turn off such filter settings in the voice application.
Here is a
list of a few voice applications and their filter settings.
If you have trouble with the audio quality and your voice application isn't listed,
then please choose one of the listed apps as a template and search for similar filter
settings in your voice application.
The filter settings commonly have names like Noise suppression, Noise reduction
or Echo cancellation.
2.3 Audio configuration
There is a total of three volumes, which must be distinguished when using Soundpad.
Soundpad speaker output volume:
You can adjust it with the volume slider in the
main window.
Soundpad microphone output volume:
It's the volume, at which others will hear your sounds.
You can adjust this volume in the audio control panel at
File ▶ Preferences ▶ Audio ▶ Volume normalization.
It is recommended, that you measure the volume of your voice with the integrated
test and that you use dynamic volume adjustment. This will ensure, that your
sounds are played as loud as your voice, no matter how loud or quiet the sound's
original volume is.
Details are explained in the
Audio preferences of Soundpad
when you click the question marks therein.
System wide microphone recording level:
It is the volume, that you can configure in
this panel
in the audio preferences of Windows.
Changing the microphone volume level or muting it does not affect Soundpad.
If you play a sound with Soundpad while your microphone is muted, others will hear that sound.
Volume normalization
Soundpad's algorithm is based on the EBU 128 recommendation, which is also used by
European television and radio stations.
When used on a complete file, then the result is exact. But the analysis of a whole file can
take some time. Therefore, when used with the option
dynamic volume adjustment, then the first 6 seconds of a sound file are analyzed
on playback to estimate the initial adjustment factor. This takes only a few milliseconds.
The analysis continues while the
file is being played back and the initial estimation becomes more and more precise and as
such the volume adjustment improves.
This works for each channel separately, meaning that a stereo file with a quiet left channel and a
loud right channel will get normalized, so that both channels have the same volume.
Block voice
You can enable this option at File ▶ Preferences ▶ Audio ▶ Block voice.
This option blocks everything your microphone records while you play a sound on the microphone
and allows you to transmit your sounds in their best quality without disturbing microphone noise.
Voice activation sound
You can enable this option at File ▶ Preferences ▶ Audio ▶ Play voice activation sound.
It can be of help if you're using voice activation instead of push-to-talk in your
voice applications.
Sometimes sounds may start off a little too quietly, so that the voice activation threshold
is met too late and the beginning of the sound is not transmitted to your interlocutors.
This option plays another very short, but properly loud sound before playing the actual sound
and triggers the voice activation beforehand. You can also exchange the provided sound with
one of your own sounds.
The sound is played on the microphone only.
The sound is not affected by the volume normalization and is played in its
original volume.
3 Tutorial
3.1 Main window
Press ESC to close
×
◁ Click screenshot
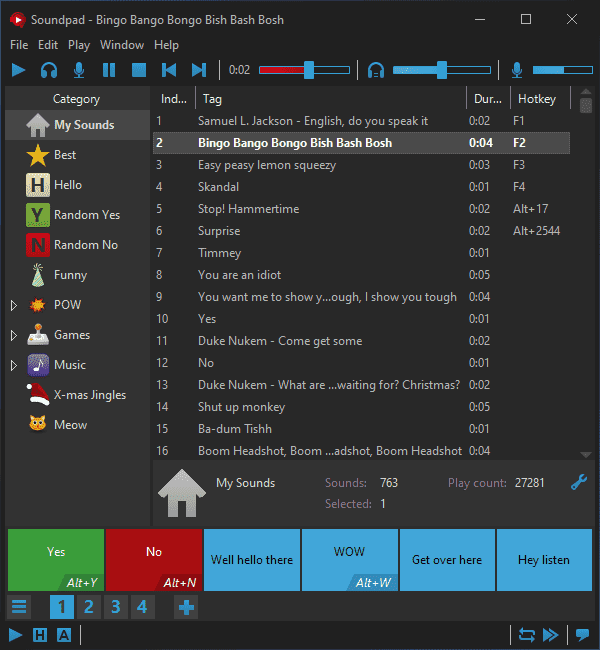
Menu
This is the menu of Soundpad.
Play
Plays the currently selected sound file on speakers and microphone.
Playing on speakers and microphone is the default behavior, but it can be changed
by setting the
Play mode
to speakers only or to microphone only.
Play on speakers
Plays the currently selected sound file on speakers only.
Play on microphone
Plays the currently selected sound file on microphone only.
Pause/resume playback
Pause or resume the currently played sound file.
You may also change the play mode by pausing and
then clicking on ,
or
.
To be able to change the play mode, you have to enable it in the preferences at
File ▶ Preferences ▶ Interface ▶ Allow resume in another play mode.
Stop
Stops playback. You can also define a
special hotkey
for this function.
Play previous file
Play previous sound file in the list. Starts to play the previous sound file even if no
sound file is currently playing.
The play mode of the last played file is maintained. It means, if your last file was played
on speakers only, then the previous file will be played on speakers only as well.
Play next file
Play next sound file in the list. Starts to play the next sound file even if no sound
file is currently playing.
The play mode of the last played file is maintained. It means, if your last file was played
on speakers only, then the next file will be played on speakers only as well.
Track timer
Shows how far the current sound file has been played back in seconds.
Double-click the timer to select the currently played sound file in its category
(or the previously played one if none is being played at the moment).
Seek slider
Shows the playback position of the currently played sound file and allows
you to jump to another position in the track.
The seek slider indicates if sounds are played to others.
It is filled
Red: The sound is played on
the microphone and others can hear it as well.
Blue(or the
configured icon color): The sound is played on the speakers only.
Right-click the slider ▶ Select file to select the currently played sound file
in its category (or the previously played one if none is being played at the moment).
Volume icon
Shows if the sound output on your speakers is muted.
You can click that icon to mute or unmute the output on the speakers.
Volume slider
Shows the output volume of Soundpad and allows you to adjust it.
The volume slider only affects the volume of your speakers, but not the volume of
the microphone. To configure the microphone volume go to File ▶ Preferences
and choose the Audio tab.
The volume slider is connected to the Windows Audio Session Volume Control, which can be
accessed by right-clicking the sound icon in the taskbar ▶ Open Volume Mixer.
If you change the volume in the volume mixer, Soundpad will show the change immediately
and vice versa.
Microphone volume
This panel shows the current peak volume of your microphone. As soon as you speak or play
sounds on the microphone, it will start to move.
It can be toggled at File ▶ Preferences ▶ Interface ▶ Toolbar
▶ Display microphone level on toolbar.
You can click the microphone icon to start the measurement of your voice volume.
Sounds will be played as loud as your voice after you finish the measurement.
Categories
Toggle categories
Window ▶ Categories ▶ Close categories / Open categories.
Add category
Right-click a category or the category area ▶ Add.
Set random hotkey
You can define a hotkey to play a random sound from a category.
Right-click a category ▶ Set hotkey.
Or right-click a category ▶ Edit ▶ Play random file.
Change icon size
Window ▶ Categories ▶ Smaller / Small / Medium / Large.
Move sounds
Move sounds by drag and drop or with Ctrl+C and
Ctrl+V from one category to another.
Move categories
Change the order of categories by drag and drop. You can also move categories into other
categories.
Category info panel
Displays additional information about the selected category. It can be toggled at
Window ▶ Categories ▶ Show info.
Double-click the info panel or click on
to edit the selected category.
Hotbar
Toggle hotbar
Window ▶ Hotbar ▶ Open hotbar / Close hotbar.
Add a sound
Drag and drop a sound file from the sound list or from the file explorer onto the hotbar.
Play a sound
Left-click the hotbar entry, or assign a hotkey by right-clicking an entry ▶ Set hotkey.
Change grid size
Window ▶ Hotbar ▶ Set hotbar format.
Change color
Right-click an entry ▶ Color.
Move entries
Drag and drop hotbar entries to change their position. Press Ctrl while moving entries to
also move their hotkey and color.
Hotbar pages
Hotbar pages share the same hotkeys. It means Alt+Y will play the
first hotbar entry of the selected page.
Hotbar pages also share the same colors by default. That behavior can be changed by
unchecking Window ▶ Hotbar ▶ Same colors on all pages.
You can quickly access that option by clicking
.
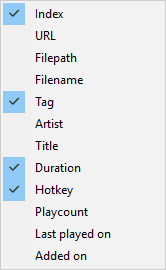
Sound list header
Sort sounds
Left-click on a column to sort the sounds by that column.
Click again to sort the sounds in opposite order.
Change column width
Drag the separator between two columns.
Move column position
Drag and drop columns from one position to another.
Hide or show columns
Right-click a column to choose which columns to show.
Sound entry
Select a sound entry by left-clicking or right-clicking it.
You can also select multiple sounds to move them to another position in the list,
or to move them into another category, or to remove them.
On right-clicking a sound you will see a context menu showing you, what you can do with
the selected sound(s):
Sound list
You can drag and drop sound files or directories containing sound files
from your Windows' explorer onto the sound list to add them.
Subdirectories are also imported.
There are also default list functions, e.g. select, remove, copy, cut, paste, move,
undo or redo. Most of these functions can be found in the Edit menu.
Status bar
The status bar shows additional information about operation outcomes, e.g.
how many sound files were imported when importing a directory, or that a long-running task,
like exporting all sound files to a directory, completed.
Certain warnings are also shown there, e.g. if you try to play a sound by hotkey and
the sound doesn't exist on your hard drive anymore.
Play mode
The play mode determines whether a sound is played back on speakers, microphone, or both
when you play it by hotkey, double-click, Enter or Play icon.
Hotkeys
Double-click it to disable or enable hotkeys. Right-click it to show a context
menu with further options.
Auto Keys
This feature automatically presses keys for you when you play sounds.
After setting it up, you can let Soundpad press the Push-to-Talk keys of your
voice applications. It can be enabled or disabled by double-clicking its icon.
Repeat playback of current file
Enable this option to have Soundpad repeat the last played sound file continuously until
you pause or stop.
Can be enabled or disabled by sole left-click or from the menu at
Play ▶ Repeat playback of current file.
If you play a sound by hotkey, then the sound won't be repeated!
You can change this default behavior by disabling File ▶ Preferences
▶ Hotkeys ▶ Misc ▶ Auto stop.
Continue playback after current file
Enable this option to have Soundpad play one file after another like a regular media player.
Can be enabled or disabled by sole left-click or from the menu at
Play ▶ Continue playback after current file.
If you play a sound by hotkey, then the playback won't be continued!
You can change this default behavior by disabling File ▶ Preferences
▶ Hotkeys ▶ Misc ▶ Auto stop.
Notifications
This is the notification area. When there is a notification, e.g.
a new version of Soundpad is available, or there's a hint because you used certain options
for the first time, then you'll see further information here.
Right-click the notification icon to display already confirmed notifications again.
◁ Point at screenshot
3.1.1 Tag column
One of the columns of the sound list is called Tag.
The tag is a set of information, which is used by many media file formats to store additional metadata
like the author, title, track, album or similar in an audio file itself.
Soundpad shows the following in the tag column, according to the tag data of the file:
Are author and title present? ⇢ Author - Title
Is only the author present? ⇢ Author
Is only the title present? ⇢ Title
Is neither author nor title present? ⇢ Filename without extension
3.1.2 Playing sounds
Select a sound by a left-click on a sound in the sound list.
Now you have different options to play the selected sound:
Press Enter.
Double-click the sound.
Click on in the toolbar.
Right-click the sound and select Play from the context menu.
All of the above play the sounds on the speakers and the microphone simultaneously.
This is the default behavior, and it can be changed by setting the
Play mode to
speakers only or to microphone only.
3.1.3 Playing sounds on the speakers only
Select a sound and then do one of the following:
Click on in
the toolbar.
Select Play ▶ Play selected file on speakers only from the menu.
Right-click the sound and select Play on speakers from the context menu.
3.1.4 Playing sounds on the microphone only
Select a sound and then do one of the following:
Click on in the toolbar.
Select Play ▶ Play selected file on microphone only from the menu.
Right-click the sound and select Play on microphone from the context menu.
3.1.5 Playing random sounds
You can let Soundpad play a random sound from your sound list.
Select one of the following menu options:
Play ▶ Play random file.
Play ▶ Play random file on speakers only.
Play ▶ Play random file on microphone only.
Another option to play a random sound is to define a
Special Hotkey.
Using the special hotkey the sound is being played on speakers and/or microphone according to
the configured Play mode.
Playing random sounds from a category
You can define a hotkey to play a random sound from a category. Right-click a category ▶ Set hotkey.
Or right-click a category ▶ Edit ▶ Play random file.
3.1.6 Playing entire sound list
You can toggle continuous playback:
by selecting Play ▶ Continue playback after current file from the menu, or
by clicking
in the status bar.
The play mode is maintained
in continuous playback. It means, if you start the playback on speakers only, then the next files will be
played on speakers only as well.
If you play a random sound with this option enabled, then the next sounds will be random as well.
To have your sound list being played over and over again, select
Play ▶ Repeat playback of sound list from the menu.
3.1.7 Adding sounds
There are different ways to add sounds.
Way 1
Select File ▶ Add sound files from the menu.
A file selection dialog will be shown, wherein you may select the sounds to be added.
On the bottom right of the dialog you can filter the files of the current directory to certain file extensions.
In this filter you can also see, which audio formats Soundpad supports.
Way 2
Drag and drop sound files or directories from your file explorer onto the sound list to add them.
You may also copy and paste sound files to Soundpad
with Ctrl+C and Ctrl+V or by selecting
Edit ▶ Paste from the menu.
Subdirectories are also imported.
Way 3
Record a sound with the built-in
Sound Recorder.
The recorded sound is added to the sound list after the recording is finished.
Way 4
Select sounds in your list, copy them and paste them in the list at a different row or in another category.
You can do so by using the default shortcuts like Ctrl+C and
Ctrl+V or by menu at Edit ▶ Copy and Edit ▶ Paste.
Way 5
Generate a voice line in the
text to speeech panel and click on
to add it to your sound list.
3.1.8 Renaming sounds
Select a sound and then do one of the following:
Press F2.
Right-click the sound and choose Rename file from the context menu.
You may now rename the sound file on your hard drive or even choose another location to move the sound file to.
3.1.9 Removing sounds
Select one or more sounds and then do one of the following:
Press Del.
Right-click one of the selected sounds and choose Remove from the context menu.
Select Edit ▶ Remove selected entries from the menu.
The files are only removed from the list. They are not deleted from your hard drive.
To remove the files from the hard drive as well:
Select one or more sounds and then press Shift+Del.
The files are not deleted permanently, but just moved to the recycle bin.
3.1.10 Select sounds in explorer
Right-click a sound and choose Select in explorer.
This will open up the Windows file explorer and select the sound file there.
3.1.11 Instant search
Do one of the following to open up the search bar:
Start to type something.
Press Ctrl+F.
Select Edit ▶ Search from the menu.
The search begins when at least 2 characters are typed. Every sound matching the search term will be
flagged with a green background.
Do one of the following to cycle through the hits:
Press Enter or ↓ for the next hit.
Press Shift+Enter or ↑ for the previous hit.
Use the two arrow buttons next to the search input field.
You can play the selected hit by pressing Ctrl+Enter. It will be played on speakers
and microphone according to the Play mode.
Disable File ▶ Preferences ▶ Interface ▶ Misc ▶ Typing begins search
if you want the search to only be done after you open the search panel.
You can clear the search input field or close the search bar to remove the hits by clicking the X-button
next to the search input field.
3.2 Sound lists
Soundpad stores a working copy of the current sound list
every 5 minutes, and once on application exit at
%Appdata%\Leppsoft, which is equal
to C:\Users\Username\AppData\Roaming\Leppsoft.
3.2.1 Backup and restore
Soundpad creates daily backups of the sound list on application start and stores them in the
above-mentioned directory.
Select File ▶ Restore sound list from the menu.
Then you can choose, which backup to restore.
3.2.2 Creating new lists
Besides the working copy and the backups you can create distinct lists.
The available options can be accessed from the File menu:
New sound list
Load sound list
Save sound list
Save sound list as...
Load recent sound list
After you've saved your sound list or loaded one, you will see the path and name of the list in
the title of Soundpad. Whenever you change something in your list, you will see an asterisk in
the title, which indicates, that there are unsaved changes.
Remember: Soundpad works with a copy of your actual list. All changes you do to it, are stored
in the working copy. It might seem like they are saved in the loaded list as well,
but this is not the case. To avoid a loss of data, save your list regularly.
You can also save the list by using the shortcut Ctrl+S.
3.2.3 Export sounds
When you are about to switch computers or re-install the operating system, and want to keep the
sound files and sound list, then use the export option: File ▶ Export ▶ Sound files.
Soundpad will ask you to select a directory for the export. All sound files of the current
sound list are copied to the target directory along with a new sound list file.
Afterwards, you can copy that directory to your new computer and just load the exported
sound list file in Soundpad.
You can use File ▶ Export ▶ Preferences to export your preferences, too.
Copy the exported file to your new system, close Soundpad on that system, and then execute
that file to import your preferences.
3.3 Hotkeys
Hotkeys are key combinations, which are assigned to certain actions.
When talking about hotkeys in Soundpad, then always global hotkeys are meant.
Global means, that those key combinations are recognized even if Soundpad is not the active window.
Hotkeys can be
single keys, e.g. F1, S, Home
key combinations consisting of one or more modifiers
and a key, e.g. Ctrl+G, Alt+Shift+S
Right-click a sound and select Set hotkey from the context menu, or
Double-click the hotkey column of the sound as shown below.
The hotkey dialog will appear:
Now you can press the key combination, you'd like to assign to the sound.
There are some predefined shortcuts to allow an easier and faster workflow.
Esc - Close the dialog without changes.
Enter - Close the dialog and save changes.
Del - Remove hotkey.
Backspace - Remove hotkey.
3.3.2 Removing hotkeys
Do one of the following to remove a hotkey from a sound:
Right-click a sound and select Remove hotkey from the context menu.
Double-click the hotkey column of the sound to open the hotkey dialog and
Click on the X-button next to the input field, or
Press Backspace or Del.
Set the same hotkey on another sound.
3.3.3 List hotkeys
There are two options to list all configured hotkeys:
Select Window ▶ Hotkeys ▶ Hotkey overview from the menu.
Right-click
in the status bar and select Hotkey overview from the context menu.
3.3.4 Mouse hotkeys
You may define mouse click hotkeys. Single left-click or right-click hotkeys are not permitted, because they
can lead to a very unpleasant experience. But, you can use them in combination with modifiers like
Ctrl+Mouse Left.
3.3.5 Special hotkeys
You can define some special hotkeys at File ▶ Preferences ▶
Hotkeys ▶ Special Hotkeys.
Special hotkeys hold a special position in Soundpad. They cannot be overwritten when
you define hotkeys for sounds.
Special hotkeys can be used to do the following actions:
Stop playback
Start playback
Pause/resume playback
Play previous file
Play next file
Select previous file
Select next file
Play selected file
Play random file
Play random file from all categories
Select previous category
Select next category
Start recording
Stop recording
Jump back by a configurable amount of seconds
Jump forward by a configurable amount of seconds
Lower speakers volume by a configurable value
Raise speakers volume by a configurable value
Set speakers volume to a certain value
Mute speakers
Set play mode to default (speakers and microphone)
Set play mode to speakers
Set play mode to microphone
Switch to next play mode
Enable Auto Keys
Disable Auto Keys
Toggle Auto Keys
Enable Hotkeys - works even if hotkeys are disabled
Disable Hotkeys
Toggle Hotkeys - works even if hotkeys are disabled
and more...
3.3.6 Numpad hotkeys
Numpad hotkeys allow you to define an incredibly large amount of hotkeys.
You can configure numpad hotkeys at File ▶ Preferences ▶ Hotkeys ▶ Numpad Hotkeys.
While default hotkeys, like every single key and every possible combination with
modifiers, allow you to define many hotkeys,
they are still very limited and may also conflict with predefined system hotkeys.
How do they work? - You press and hold a modifier, e.g. Alt as it is predefined, then you type an
arbitrary number on your numpad and release the modifier.
E.g. Alt+123 or Alt+55.
Numpad hotkeys can't be used as special hotkeys.
If you assigned Alt+Num1 or Alt+Num2 and
similar hotkeys to sounds while the numcode option was disabled, and then enable the numcode
option afterwards, then those conflicting hotkey assignments are removed from the sounds.
Numcode
You can enable this option at File ▶ Preferences ▶ Hotkeys ▶ Numpad Hotkeys.
Furthermore, you can specify, which modifier(s) you want to use.
Index
Every entry in the sound list has a unique index according to its row in the hidden
All sounds
category. If you don't want to set up hotkeys for each and every sound, you can enable
Index hotkeys at File ▶ Preferences ▶ Hotkeys ▶ Numpad Hotkeys.
Define the modifier(s) you want to use. Now you can press and hold the modifier and type a
number on your numpad. After releasing the modifier, the sound with the index equivalent to
your entered number will be played.
To permanently show the hidden All sounds category, select it from the menu at
Window ▶ Categories ▶ All sounds. Then double-click the info panel or
click on .
Uncheck Hide category in the upcoming dialog.
3.3.7 Advanced options
You can change these options at File ▶ Preferences ▶ Hotkeys ▶ Advanced options.
Pass hotkeys
Soundpad complies with the global hotkey mechanism in Windows and blocks hotkey propagation by default.
If you assign W to play a sound, and then press W,
Soundpad will play the sound, but your foreground application won't receive the W.
By enabling Pass hotkeys, the default behavior is changed and Soundpad won't block the hotkey.
Staying with the above example, pressing W will not only play the sound, but it will also do,
whatever W is supposed to do in your foreground application.
You can also switch that option in the main window:
Right-click
in the status bar and select Pass hotkeys from the context menu.
Auto stop (recommended)
Automatically stops playback after a sound was played by hotkey even if options to repeat or
continue playback are enabled.
Allow left and right modifiers
Allows hotkeys like Ctrl+F1 and RCtrl+F1.
Otherwise left and right Ctrl are treated as the same modifier.
Same hotkeys in all categories
Allows to set hotkeys to a row instead of assigning the hotkey to a particular sound.
The hotkey will play the sound at that row of the currently selected category.
3.4 Sound Recorder
The sound recorder allows you to record your speaker's output, and thus sources like YouTube or similar.
3.4.1 Start and stop recording
Do one of the following to open up the recording panel:
Press Ctrl+R, or
Select Window ▶ Sound recorder from the menu.
The recording panel will be displayed:
Start recording by clicking on .
The record button becomes red:
The peak meter is filled with a colored bar to indicate the current loudness of the recording.
Click on to finish recording. Soundpad will encode
the recording and add it to your sound list.
Click on to open the recorder preferences.
The volume slider directly affects the recording volume, so it's recommended to leave the volume
unchanged while recording.
3.4.2 Recorder preferences
You can access the recorder preferences by
clicking the gear button in the sound recorder, or
selecting File ▶ Preferences ▶ Recorder from the menu.
Save as
You can choose M4A, MP3 or WAV.
WAV is an uncompressed audio format and takes a lot of space on the hard drive,
but it doesn't require encoding or decoding.
This makes the recording save process faster.
M4A (recommended) is a compressed audio format and enabled by default.
It takes considerably less space on the hard drive, while maintaining a very good quality of the
original sound, but it requires encoding and decoding. While decoding is unnoticeably fast, the encoding
takes some time, in particular for long recordings. The recording save process takes longer than
with WAV.
MP3 is a compressed audio format like M4A.
Independent of your system's rendering configuration, Soundpad will convert every recording to
stereo with a sample rate of 48.000 Hz.
Insert position in sound list
Specify where your recordings shall be added in the sound list.
You can choose between Beginning and End.
Automatically normalize recordings
This option is highly recommended, because the sound output on your speakers or headphones is amplified.
The digital audio representation in the audio processing can be much lower than the perceived output.
Recordings can be very quiet if this option is disabled.
The default value is 89 dB. This value equals -23 LU, which is the suggested standard by the
EBU 128 audio normalization recommendation.
Higher values than 99 dB are not recommended, because they're very close to
the limit and will lead to clipping and noticeable distortion.
Trim silence
When enabled, beginning and ending silence is removed from new recordings.
Maximum recording time
This is a protection setting to avoid recording indefinitely. You can remove it by setting it to 0. The default
value is 300 (5 minutes).
Long recordings are buffered on the hard drive in the %TEMP%-directory.
The buffered data is uncompressed and requires a lot of disk space. If the maximum recording time is disabled,
and you don't finish a recording yourself, then Soundpad will continue to record until the disk runs out of space.
3.4.3 Recorder hotkeys
You can define special hotkeys to start and stop recording. This is helpful if you want to record a
sound while running exclusive fullscreen games or applications.
You get an audio notification when using these hotkeys. The recording will begin immediately after
the notification sound was fully played, so it isn't recorded as well.
The notification sound can be changed or disabled at
File ▶ Preferences ▶ Notifications ▶ Recorder.
3.5 Sound Editor
You can access the sound editor by right-clicking a sound in your sound list
and selecting Edit file from the context menu.
Press ESC to close
×
◁ Click screenshot
Menu
This is the menu of the sound editor.
Play
Plays the edited sound from the beginning on your speakers.
Play on speakers
Plays the selected section of the edited sound on your speakers.
When there is no selection, then the entire file is played black.
Stop
Stops playback.
Cut
Removes the selected section. You may also press Del for this.
The section is not copied into your clipboard and
cannot be pasted at another position.
Crop
Removes everything except for the selected section.
Undo
Restores the sound as it was before your last action.
Actions are cut, crop, volume adjustment, etc.
Redo
Redo your last action. Only available after at least one Undo.
Zoom in
Zoom into the visualization. Allows more precise cutting.
Zoom out
Zoom out of the visualization.
More options toggle
Opens or closes another bar with additional options.
Sound visualization canvas
This is the editing canvas with a graphical representation of the edited sound.
The bigger the vertical lines are, the louder the sound at this position is.
Flat lines are silence.
You can select the section you want to edit with your mouse or by using default
selection keys like
Shift+←, Shift+→,
Shift+Home and Shift+End or
you can select everything with
Ctrl+A.
To deselect everything use Ctrl+D.
You can also move the selection cursor with ←, → or with the
keys Home and End.
Sound file attributes
Lists additional information about the edited sound. The information is not
updated when editing the file.
Size: File size in KB or MB.
Format: File format like M4A, MP3, WAV etc..
Sample rate: States with how many samples per second the sound was recorded.
Duration: minutes:seconds +milliseconds.
Channels: Mono, Stereo, or 3+ channels. Only the first channel is displayed
in the visualization canvas.
Volume: The volume level of the original sound file before editing.
◁ Point at screenshot
3.5.1 Peculiarities
Limitation
Soundpad is not designed to edit audio files, which are longer than 10 minutes.
You may still do so, but you will see a warning message, which you have to confirm to begin editing.
The main reason for this is the huge memory consumption while working with uncompressed audio data.
It is actually not a big deal, but you'll probably be more satisfied using another
audio editor to edit big files.
File format
The preselected file format, when saving an edited sound, is the one, that is configured
in the recorder preferences at File ▶ Preferences ▶ Recorder ▶ Save as.
(See also: Recorder preferences).
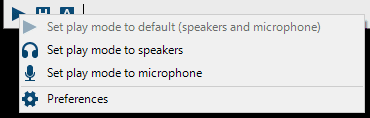
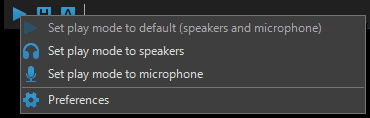
3.6 Play mode
The play mode determines if sounds are played on speakers only, microphone only or on both
when they are played by hotkey, by double-click, by pressing Enter or by clicking on
in the toolbar.
3.6.1 Usage
The play mode is the first icon in the status bar. When you move your mouse cursor above it,
a tooltip will show the active play mode.
You can change the play mode by left-clicking or right-clicking the first icon in the status bar.
Another way to change the play mode is to define
special hotkeys, with which you can:
Set play mode to default (speakers and microphone)
Set play mode to speakers
Set play mode to microphone
Switch to next play mode
Setting the play mode by hotkey will give you an acoustic notification, that you can disable or
change at File ▶ Preferences ▶ Notifications.
When you play the first sound after application start and the play mode is not set to default
(speakers and microphone), then you will be remembered by an acoustic notification about the
active play mode. This notification can be disabled in the notifications preferences by
unchecking Notify me when playing first sound after application start.
3.6.2 Switch to next play mode
The behavior of the special hotkeySwitch to next play mode can be further configured at File ▶ Preferences ▶
Interface ▶ Play mode ▶ Hotkey switches between...
E.g. one option is to set it to default and speakers, so you can quickly switch from
speakers and microphone to speakers and back with the use of just one hotkey.
3.7 Auto Keys
The auto keys feature lets you define keys, that Soundpad will press automatically, when you play a sound.
So, you can play a game and let Soundpad press the Push-To-Talk key for you.
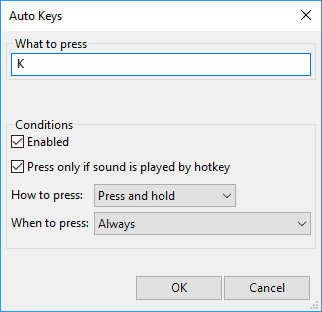
You can configure auto keys at File ▶ Preferences ▶ Hotkeys ▶ Auto Keys.
Auto Keys may not work if certain conditions aren't met. Right-click on
in
the main window and select Troubleshooting to find out which condition isn't met.
3.7.1 Conditions
Auto keys are really powerful and in some situations they can even be dangerous.
Therefore, you should take some time and configure the conditions as strictly as possible.
You'll find below window at File ▶ Preferences ▶ Hotkeys ▶ Auto Keys ▶ Add.
Let's go through each condition and see what they do.
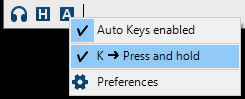
Enabled
It's a general switch to enable or disable an auto key.
You can also switch an auto key from the status bar of the main window by left-clicking or right-clicking
on .
Besides of that, auto keys are only pressed, if the active
play mode is set to speakers
and microphone or microphone only, because there is no need to automatically press Push-to-Talk
keys when the sound is played on speakers only.
Press only if sound is played by hotkey
This condition is turned on by default, thereby auto keys are only pressed when you play sounds by hotkey.
You can uncheck this option for each auto key separately if you want the auto key to also be pressed
when you play a sound from the user interface, e.g. by double-click or from the toolbar.
How to press
You can choose between press and hold and press before and after.
Press and hold
When you play a sound, the specified key is pressed and kept pressed. As soon as the sound has
been fully played, or you stop the playback, the key is released.
Soundpad will not press the key again if you press and release it on your keyboard while playback.
Press before and after
When you play a sound, the specified key is pressed and released before the sound starts to play.
As soon as the sound has been fully played, or you stop the playback, the key is pressed and released again.
To make it more human-like and reliable, there is a short delay between press and release.
When to press
Always
When you play a sound and the above conditions are met, then the key is always pressed.
Foreground application is fullscreen
When you play a sound, the key is only pressed if the foreground application is running in fullscreen mode.
This also applies for games, that are displayed in a fullscreen borderless window.
Certain application is running
After choosing this option, you'll see a list, where you can add applications.
The key will only be pressed if at least one of these applications is running.
Certain application is in foreground
When you choose this option, you will see a list, where you can add applications.
The key will only be pressed if one of these applications is the active foreground application
at the moment, you play a sound.
3.7.2 Examples
Here are some examples to show, how auto keys can be used in real scenarios.
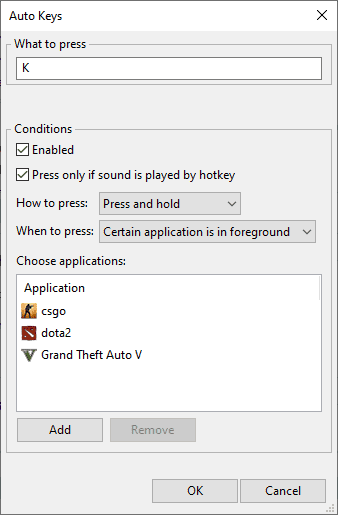
Scenario 1: Press the Push-to-Talk key of my game, when I am in-game
In the game itself, you need to set a
simple key
as the Push-to-Talk key, e.g. K or Mouse4.
Then configure the auto key like below:
After applying the preferences, you'll see that entry in the status bar of the main window by
left-clicking or right-clicking on
.
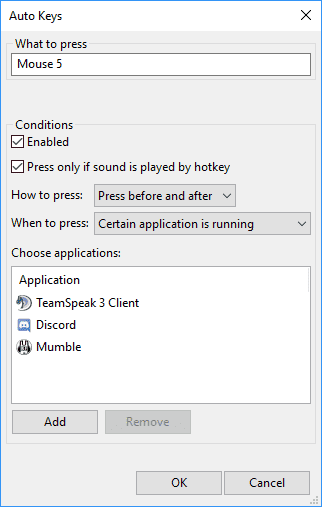
Scenario 2: Mute me in Teamspeak, Discord, Mumble or similar
Set a key to mute/unmute yourself in the voice application, e.g. B or Mouse5.
Then configure the auto key like below:
After applying the preferences, you'll see that entry in the status bar of the main window by
left-clicking or right-clicking on
.
Scenario 3: Mute me in the voice application
and press the Push-to-Talk key in-game
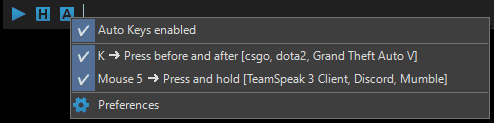
This is a combination of the first two scenarios.
Add an auto key entry like shown in
Scenario 1 and another entry like shown in
Scenario 2.
After applying the preferences, you'll see both entries in the status bar of the main window by
left-clicking or right-clicking on
.
3.7.3 Toggling Auto Keys
You can disable or enabled all auto keys in different ways:
Double-click
in the status bar of the main window.
Right-click or left-click
in the
status bar of the main window and check the top most entry of the context menu.
Define one of the
special hotkeys to disable,
enable or toggle auto keys.
3.7.4 Troubleshooting
Auto Keys may not work if certain conditions aren't met. Right-click on
in
the main window and select Troubleshooting to find out which condition isn't met.
3.8 Text to speech
You can play and save generated voice lines with the integrated text to speech panel.
Soundpad uses system voices, which are already installed on your computer.
3.8.1 Usage
Do one of the following to open the text to speech panel:
Press Ctrl+T
Select Window ▶ Text to speech from the menu.
Click on to open the voice selection and additional options.
3.8.2 Playing voice lines
Type in the text to be played and then:
Press Enter to preview the text. It will be played on the speakers only.
Press Ctrl+Enter to play the text on speakers and microphone.
Playing on speakers and microphone is the default behavior, but it can be changed
by setting the play mode
to speakers only or to microphone only.
You may also play the text from the toolbar, as long as the TTS panel has focus, by clicking on
,
or
.
Define special hotkeys
to play the text even if Soundpad isn't the active window.
Click on to add the generated voice line to the sound list.
The recorder preferences, e.g. the target directory or the file format, are applied when saving
TTS sounds. You can configure it at File ▶ Preferences ▶ Recorder.
Try the free standalone Text-To-Speech app,
which plays sounds in Soundpad from different voice providers like Amazon, Google or IBM.
3.9 Remote Control Interface
This interface can be used to control Soundpad from command line or from other applications.
The commands DoAddSound and DoRemoveSelectedEntries are not allowed in the trial version of Soundpad and
will return an appropriate error message.
3.9.1 Command Line
You may execute specific commands in Soundpad by calling Soundpad.exe with the
-rc parameter.
To do so:
Open the Command Prompt: Press Win+R > cmd
Navigate to Soundpad's installation directory:
cd "C:\Program Files\Soundpad" or
cd "C:\Program Files (x86)\Steam\steamapps\common\Soundpad"
Play first sound: Soundpad -rc DoPlaySound(1)
List available commands: Soundpad --help
It's not necessary to navigate to the installation directory first. Instead, you can execute
"C:\Program Files\Soundpad\Soundpad -rc DoPlaySound(1)" with the surrounding quotes from any directory.
The syntax is Soundpad -rc command, e.g.
Soundpad -rc DoPlaysound(1).
Example: DoPlaySoundFromCategory(2,1,true,false)
▶ plays 1st sound from category 2 on speakers only
Example: DoPlaySoundFromCategory(-1,7)
▶ plays 7th sound in selected category
DoPlayPreviousSound()
DoPlayNextSound()
DoStopSound()
DoTogglePause()
DoJumpMs(timeMillis)
Example: DoJumpMs(2000) ▶ jumps forward by 2 seconds
DoSeekMs(timeMillis)
Example: DoSeekMs(10000) ▶ jumps to the 10th second in the track
DoStartRecording()
DoStopRecording()
The above list may be outdated in this document, so use "Soundpad --help"
to get the correct list.
3.9.2 Applications
This section is for software developers who want to control Soundpad from their own applications or plugins.
Soundpad uses a named pipe for
the communication with other
local applications.
For this reason, Soundpad and the other application don't require internet or network access.
Applications can connect locally to the pipe and begin to issue commands.
The list of available commands is more extensive than the one for the command line, so they aren't listed
here, but the following article links to some sample implementations in
different programming languages. We'll keep the Java implementation up-to-date, so it contains all
available commands.
Further information about functions and parameters can be found in the javadoc comments
in the sample Java implementation.
3.9.3 Logs and Debug
Logging of remote control commands is turned off by default, so you won't see any commands or strings,
that Soundpad receives, and why commands may have failed.
To get more information about the processing of remote control commands, you need to turn on the
remote control logs.
Enabling remote control logs
Run Soundpad once and then close it.
Open the Registry editor: Win+R > regedit
Navigate to HKEY_CURRENT_USER\SOFTWARE\Leppsoft\Soundpad\MainFrame
Find the entry logRcCalls and set its value to 1.
Start Soundpad.
Open the logs from the menu at Help ▶ Show logs.
Now, when you do a remote call by using the pipe or the command line, Soundpad will log the call
in the log component at the bottom of the main window,
e.g. Remote control: DoPlaySound(2): R-200: 0 ms
Explaining the log
Here is a breakdown of the logs, based on a call with the unknown command test-abc Remote control: test-abc: R-404: Command not found.: 0 ms
Command entry: Remote control.
Received command: test-abc.
R-404: Command not found: The code derived from HTTP-404.
0ms: Duration of fully processing the request.
Disable debugging
Close Soundpad.
Open the Registry editor: Win+R > regedit
Navigate to HKEY_CURRENT_USER\SOFTWARE\Leppsoft\Soundpad\MainFrame
Find the entry logRcCalls and set its value to 0.
3.10 Web import
The URI scheme soundpad:// can be used to add sounds from a website to Soundpad.
Soundpad only supports downloads from HTTP and HTTPS sources.
It can be simple e.g. Content-Disposition: attachment; filename=sound.mp3
or better
UTF-8: Content-Disposition: attachment; filename*=UTF-8''%E4%BD%A0%E5%A5%BD%E5%A3%B0%E9%9F%B3.mp3
3.10.3 Misc
Downloaded sounds are saved in the directory, that the user specified at File ▶ Preferences ▶ Recorder ▶ Save recordings in.
Errors
Possible errors are:
Error when importing files: File format is not supported.
Occurs if
the Content-Disposition isn't set or contains malicious elements like invalid file name characters (/:*? etc.).
the filename doesn't end with one of the supported formats like mp3.
the file content isn't supported, similar as if the file is downloaded by the browser and then added to Soundpad.
Error when importing files: Call has wrong format: %the call%
Occurs if
the call isn't recognized.
an older version of Soundpad is used. This interface was introduced in v4.0.0.
Error when importing files: Download failed: HTTP-404
4 Miscellaneous
4.1 Files
Working files
Located at %Appdata%\Leppsoft, which is equal to
C:\Users\Username\AppData\Roaming\Leppsoft.
Soundpad stores a working copy of the current sound list, backups of the sound list
and the stats at this location. It's the predefined location for recordings, too.
Application files
Located at the installation directory, which you chose when installing Soundpad.
The default directory is C:\Program Files\Soundpad or
C:\Program Files (x86)\Steam\steamapps\common\Soundpad.
Folder languages: Contains translations.
Folder sounds: Contains some demo and notification sounds.
File Soundpad.exe: The main executable with the graphical user interface.
File SoundpadService.exe: Handles hotkeys and auto keys.
Is automatically launched and closed by Soundpad.
File UniteFx.dll: The driver extension component.
File TTS.dll: Handles text to speech synthesizing.
Instance files
Located at C:\ProgramData\Leppsoft\Soundpad.
Contains driver logs and crash dumps.
File license.dat: Upon registering a full version of Soundpad this file removes
the trial limitations.
Driver extension files
As of version 2.4.6 the driver extension component UniteFx.dll (or UniteFxUpdate.dll in the Steam edition)
is copied to %WinDir%\system32\UniteFx.dll, which is equal to
C:\Windows\system32\UniteFx.dll. This fixes critical issues,
which prevent Soundpad from working.
The driver extension component is then loaded up by the system.
Special files
The SoundpadService.exe is copied to
%ProgramFiles%\Common Files\Soundpad, which is equal to
C:\Program Files\Common Files\Soundpad. This directory is write-protected by
default, and allows this higher privileged component of Soundpad to run in compliance with the
Windows Integrity Mechanism Design.
4.2 Stats
Each time you play a sound on the microphone the sound's play count is increased and its last played date
is updated. This helps you to keep track of often and less often played sounds, so you don't annoy your
friends by playing the same sound over and over again.
You can show the play count and the date when a sound was played the last time by
right-clicking the sound list header and selecting Play count and Last played on.
The stats are saved at %APPDATA%\Leppsoft\stats.spl.
Stats are persisted beyond sound lists, but get lost when you move a sound file from one hard drive partition
to another.
Stats are stored locally and can be reset for particular sounds by selecting the sounds,
right-clicking one of them and selecting Reset play count from the context menu.
You may also show the all-time play count by selecting
File ▶ Stats ▶ Show all-time play count from the menu.
The count will be shown in the status bar.
You can reset all play counts by selecting File ▶ Stats ▶ Reset play count from
the menu. This menu entry is followed by a confirmation dialog.
4.3 Updates
This section is for the standalone version. The Steam edition of Soundpad
is updated through the Steam Client.
You can check for updates manually by selecting Help ▶ Check for updates from the menu.
You can also turn on automatic update checks in the preferences at
File ▶ Preferences ▶ Updates.
You can choose between Never, which is the default, Daily and Weekly update checks.
The check is done once a day or once a week on application startup. When an update is found, you will see it
in the status bar and can then start the update by selecting Help ▶ Check for updates from
the menu.
If you don't want to grant Soundpad an internet connection, then you can always download
the latest version from here and install it onto your current version.
The installer will keep your settings untouched.
4.4 Registering the full version
After purchasing the full version you will receive your serial number by email.
Download and install the free version of Soundpad if you haven't done that already.
Now, you can unlock the paid features in two ways:
Start Soundpad and select Help ▶ Register from the menu.
Then enter your serial number there. This way requires an internet connection to the registration server.
Without granting an internet connection to Soundpad, you may visit the
registration page and follow the instructions there.
5 Uninstallation
5.1 Steam edition
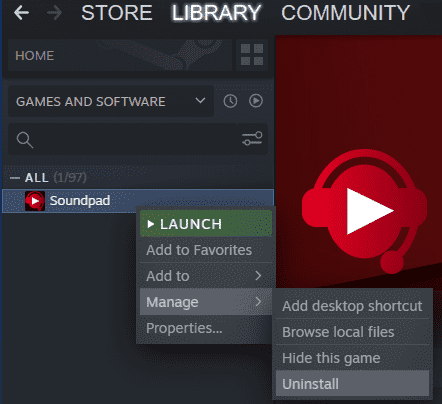
Open your Steam library and choose to display Games and Software.
Right-click Soundpad and select Manage ▶ Uninstall from the context menu.
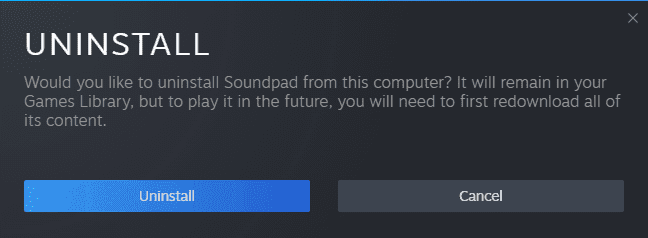
Choose Uninstall in the upcoming confirmation prompt of Steam.
5.2 Uninstall standalone version
Uninstall by Windows' control panel
This is the guide for Windows 10, but different versions like Home or Professional may look differently.
Open Apps and Features (Or press Win+R > ms-settings:appsfeatures)
Or click on the start menu ▶ Gear icon (Settings) ▶ Apps.
Select Soundpad and click on Uninstall.
Confirm the uninstallation in the upcoming prompt.
Uninstall by installer
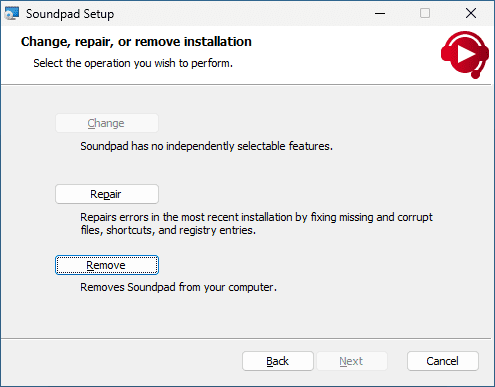
Run the installer and choose Remove in the wizard.
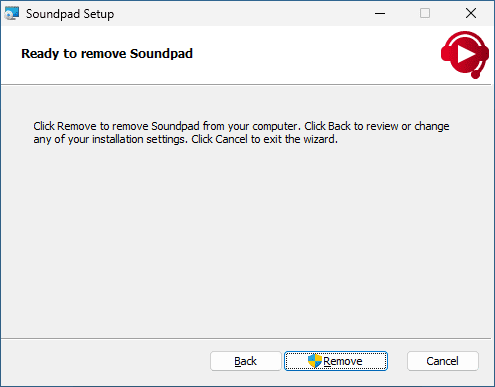
Administrator privileges are required to uninstall Soundpad.
By clicking on Remove you will see a prompt to allow the uninstallation.
If your sounds are played to others in low quality, then skip this chapter and use
that guide.
Soundpad automatically tries different setup modes and selects the best suitable one based on a variety of factors.
This section is for users, who still experience problems with the automatically selected setup.
Preparation (optional)
Close any games or apps, that are currently recording from the device,
because their recordings will be interrupted.
There can be many modes depending on system, device and drivers. It's recommended to either run Soundpad as administrator or
to lower the UAC settings for the duration of the setup changes,
otherwise you'll get a UAC prompt with every setup mode, that you select.
Guide
Open the device preferences at File ▶ Preferences ▶ Devices, right-click the affected
device and select Set setup mode.
Not all devices support different setups, so you might see another message instead of the dialog below.
In such a case, please check
the general compatibility issue section.
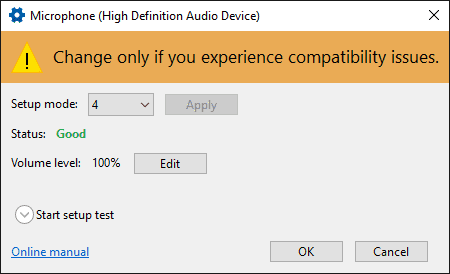
Click on Start setup test at the bottom left and follow the instructions there-in.
Soundpad begins to record from your microphone and plays the recorded audio back on your speakers with a
little delay. Now you can switch setup modes and test the audio quality of your voice and of played sounds.
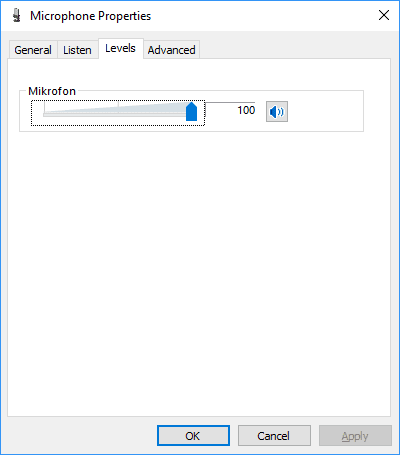
If your microphone is muted, the volume level will be displayed like 100% (muted).
To be able to test the voice quality, you need to click on Edit and unmute your microphone in Windows.
Soundpad plays the currently selected sound from your sound list. Close the dialog
and select a different sound in the main window if you want to test it with a different kind of sound.
Finding a proper setup mode
Change the setup mode and click on Apply.
Say something: Your voice should sound as before using Soundpad.
Play a sound: It should play properly without distortions.
Run a voice app, that had conflicts with Soundpad, and test if sounds are played there.
If you had it running before changing the setup mode, then restart the voice app to be extra sure.
Caution: Turn off the voice app's filter settings,
as these may be the actual reason for low quality sounds independent of the setup mode.
Continue with the next setup mode and stop when you are satisfied.
General rule: The lower the setup mode the better. Setup mode 1 is better than 6.
Contact us with the diagnostic report and we check
if the installation routine needs to be adjusted for your audio device.
Update your audio drivers to the latest version.
If you have a Realtek sound card and use OEM audio drivers, that are from your motherboard
or notebook manufacturer, then try the generic ones from Realtek (R2.82 or newer):
Realtek HD audio drivers.
Install the Microsoft HD audio drivers. Soundpad always works with these.
This instruction was created on Windows 10 Build 1803.
It may differ on other versions of Windows.
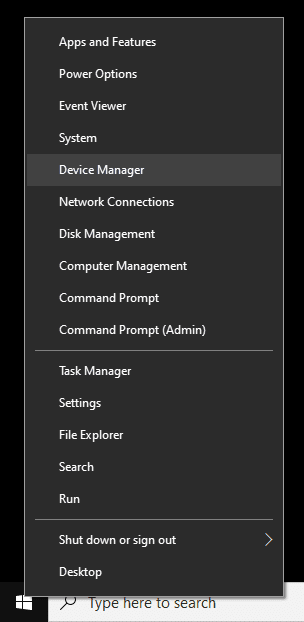
Right-click Start ▶ Device Manager
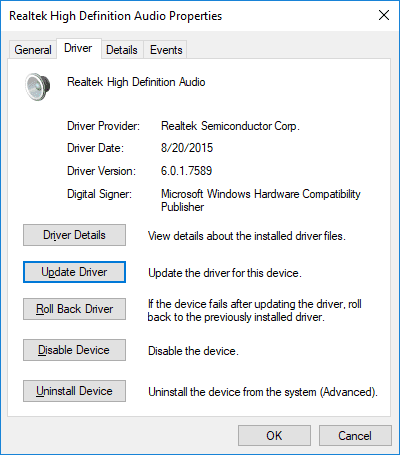
Expand the node Sound, video and game controllers and double-click the Realtek device or
right-click it and select Properties.
Switch to the Driver tab and click Update Driver.
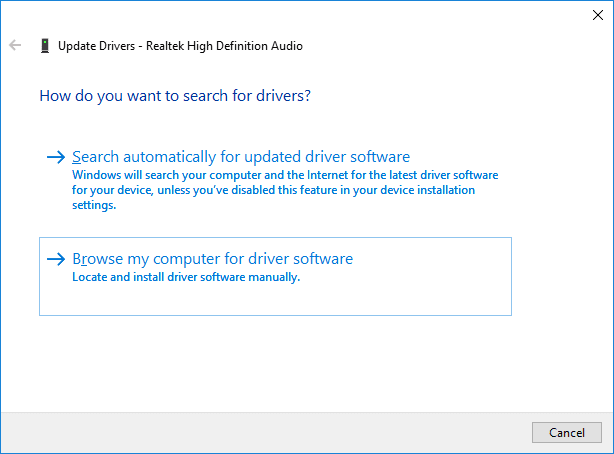
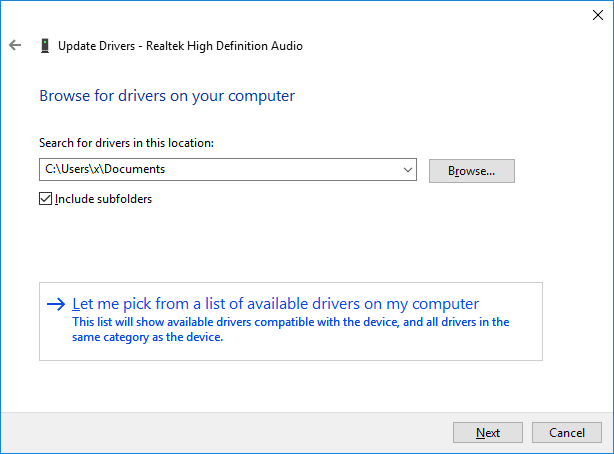
Select Browse my computer for driver software.
Select Let me pick from a list of available drivers on my computer.
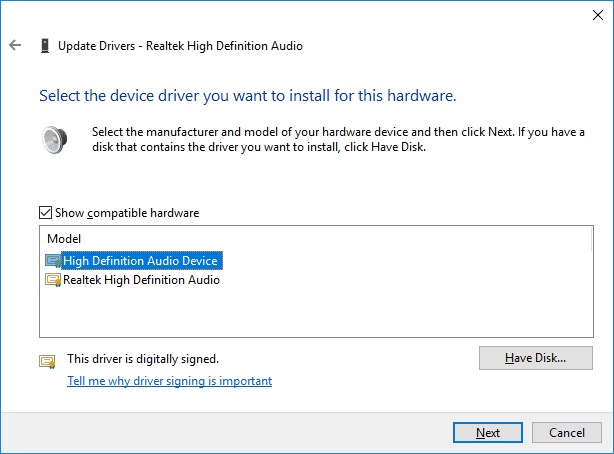
You should see these two entries. High Definition Audio Device is the driver from Microsoft and the
other one, as the name already tells, is from Realtek. Choose High Definition Audio Device and
click on Next.
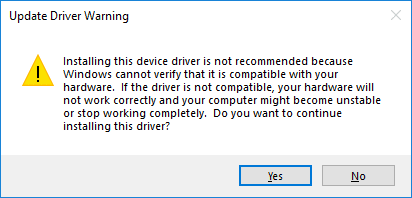
Continue by confirming the update warning with Yes.
If you have any trouble with the Microsoft driver, then you can easily switch back to the
Realtek driver by repeating the first 3 steps until you reach the following dialog and by
selecting Roll Back Driver.
Last step
Run Soundpad and open the device preferences at File ▶ Preferences ▶ Devices.
Select your microphone and click on apply to finish the configuration.


 Start recording by clicking on .
The record button becomes red:
Start recording by clicking on .
The record button becomes red:

 The peak meter is filled with a colored bar to indicate the current loudness of the recording.
Click on to finish recording. Soundpad will encode
the recording and add it to your sound list.
Click on to open the recorder preferences.
The peak meter is filled with a colored bar to indicate the current loudness of the recording.
Click on to finish recording. Soundpad will encode
the recording and add it to your sound list.
Click on to open the recorder preferences.

 Let's go through each condition and see what they do.


 After applying the preferences, you'll see that entry in the status bar of the main window by
left-clicking or right-clicking on
.
After applying the preferences, you'll see that entry in the status bar of the main window by
left-clicking or right-clicking on
.


 After applying the preferences, you'll see that entry in the status bar of the main window by
left-clicking or right-clicking on
.
After applying the preferences, you'll see that entry in the status bar of the main window by
left-clicking or right-clicking on
.


 Click on to open the voice selection and additional options.

 Not all devices support different setups, so you might see another message instead of the dialog below.
In such a case, please check
Not all devices support different setups, so you might see another message instead of the dialog below.
In such a case, please check

